Thursday, December 30, 2010

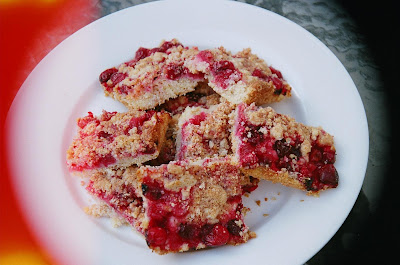
cranberry bars


So, I made these weeks ago. I'm just posting them now because I had to wait for my film to be developed. Oh, my anachronistic photo techniques really catch up with me sometimes. Now I'm looking at these cranberry bar pictures, wishing I was actually eating one now. They were so good--the perfect thing for my holiday cranberry fix.

I followed this recipe from Good Life Eats, a really lovely blog. For the crust I tweaked the gluten-free flour blend suggested by Die Hard Foodie. It was perfect. Totally worth pulling out every single one of my jars of flours.

I know the holidays are over, but you should really make these. Cranberry is a humble berry that needs its love too, beyond the holidays.


GLUTEN-FREE CRANBERRY BARS
(Wheat-phages: if you want to make these with regular flour, just follow this recipe.)

crust:
1 cup sugar
1 tsp baking powder
1/4 tsp salt
1 cup almond flour
1 cup rice flour
1/2 cup potato starch
2 tsp xanthan gum
1/2 tsp cinnamon
1 cup butter (cold)
1 egg

filling:
1/8 cup orange juice
2/3 cup sugar
1 tsp vanilla
1 tbs cornstarch
4 cups cranberries (fresh or frozen & thawed)

Preheat the oven to 350. Grease a 9x13 baking dish.
In a small bowl, mix together the dry ingredients for the crust. With a fork or your hands, cut in the butter & egg, until the mixture is crumbly & cohesive. Pat one half of the dough into the bottom of your dish.
In another bowl, mix together the first 4 ingredients for the filling. Add the cranberries and toss until they are well-coated. Pour the cranberries in an even layer over the top of the crust.
Crumble the remaining dough over the top of the cranberries. Bake for 45-55 minutes, or until the top is browned.
Allow to cool in the refrigerator completely before eating (I know this is hard, but I'm serious! If you try to eat them warm, you'll be eating crumbly crust and scalding hot jam.)

Monday, December 6, 2010

chewy gingersnaps


As soon as December rolls around, I start to hear this little voice in the back of my head. It wakes me up in the night, growing ever louder and more persistent...

"Amanda...bake...the gingersnaps!"

Okay, so maybe it doesn't happen like that. But as soon as I see Christmas lights up, I start craving these cookies. It's like Pavlov's dogs. Hear "Jingle Bell Rock," drool, bake cookie.

These are everything I could ever hope for in a cookie. Thin, crispy on the outside, melty on the inside, and full of flavor. I'm not a huge fan of ginger (so sue me,) and these cookies don't actually have ginger in them (sue me twice.) I guess if we're going to get technical here, they're more like molasses cookies. But hey, we're all cool with that, right?


CHEWY GINGERSNAPS
Makes about 2 dozen

1 stick butter
1 cup sugar, plus a little for coating
1 egg
1/8 cup molasses
2 cups flour*
1 tsp cinnamon
2 tsp baking soda
1/2 tsp salt

1. Preheat oven to 350.
2. Cream butter & sugar.
3. Add egg & molasses, and mix well.
4. Sift in the dry ingredients.
5. Refrigerate the dough for 30 minutes, or as long as you can stand it.
6. Roll the dough into balls the size of walnuts, coat in sugar, and bake for 8-9 minutes.
7. Remove from the pan asap. They will get firmer and crispier as they cool, so don't overbake!

* I substituted a gluten-free flour blend (honestly couldn't tell you what's in it), but all-purpose flour works great as well.

Wednesday, November 24, 2010

chocolate pecan pie


So, after tasting this pie, I realized that it deserved its own post.

While I was searching for a special pecan pie recipe, my mom suggested chocolate pecan pie. And really, what could be better? It's pecans...it's chocolate...it's pie. I'm in. So I adapted a recipe out of our ancient Betty Crocker Cookbook. I accidentally underbaked mine a bit, but honestly that worked to my advantage. I ended up with an ooey-gooey chocolate pecan pie. Oh man. I'm double in.


For my pie crust, I made half a recipe of Smitten Kitchen's all butter pie crust. Though I only had a little sample (to avoid the wheat hangover), it was a really great crust, and very easy. But, if you want to substitute your own pie crust recipe or a frozen pie crust (hey, I know how it goes), that's cool too. The point is, you need one pie crust in a pan to serve as a vessel for chocolate and pecans.

I have to admit that this is probably the world's easiest pie. It's almost embarrassing. All the more reason you should make it.

CHOCOLATE PECAN PIE
(makes 1 10-inch pie)

1 pie crust
4 eggs
3/4 cup sugar
1/3 cup butter, melted & cooled
1/2 cup corn syrup (I know, I know, but this is tradition we're talking about!)
1/2 cup pure maple syrup
1/2 cup cocoa powder
1 1/2 cup pecan halves
1/2 tsp salt

Preheat oven to 375. Press pie dough into a 10" pie pan.
Beat together eggs, sugar, butter, cocoa, and syrups. Stir in pecans. Pour into prepared pie pan.
Bake for 40-50 minutes, or until the pie only quivers slightly in the middle when you jiggle the pan.

Friday, November 19, 2010

what i'm baking today

Traditional Apple Pie

Chocolate Pecan Pie (Oooo it looks like the surface of some foreign and delicious planet.)

Apple Galette (This was a happy accident because it was just leftover apple pie stuff. I had no recipe and no idea what I was doing, so this is more-or-less a miracle.)

Sunday, November 7, 2010

gf chocolate chip sandwich cookies with peanut butter frosting & a love story


Alright world, it's about to get sappy and personal. Here's something you might not know about me: I have a boyfriend. He lives three hours away in my hometown. I'm living here so I can, you know, go to college and have like, a future and stuff. What can I say? I'm practical. (If we've ever talked for more than five minutes, you'll probably find that previous statement hilarious.)

I like to keep things in my life pretty easy. But if you've ever been in a long distance relationship, you know that it occasionally sucks. Sometimes you want something a little more tangible than a phone call. Maybe he buys a bus ticket, or you drive home for the weekend if you can.


Unfortunately, we can't always meet up for the weekend. Life is busy--that's unfortunately just how it goes. Nevertheless, love is a bewildering thing, and sometimes you feel compelled to make some kind of gesture. Sometimes you just have to send that sweet boy a letter, a mix cd, and some cookies. And that's just what I did today.

I made the cookies gluten free because...well I had to be able sample them, didn't I? I got the recipe directly from the Land O Lakes website, and it was really great. The frosting recipe was adapted from All Recipes. The only change I made was to substitute almond milk for the heavy cream. I used plain ol' JIF for this one; I've found that natural peanut butter doesn't work very well for frosting.

GLUTEN FREE CHOCOLATE CHIP SANDWICH COOKIES

1. Make the cookies. Allow the dough to refrigerate as long as possible before you bake. The firmer the dough, the better they will cook up.
2. Make the frosting.
3. Allow the cookies to cool, and sandwich them with a spoonful of frosting in between.

Send them to your honey, your Momma, or just pig out and appreciate how much you love yourself, you fabulous human being, you!

turkey chili texas style


Let me start by dispelling a misconception about Texas chili. Many non-Texans seem to be under the impression that Texas chili is bean-less by doctrine. Myth! I don't know who spread this rumor, but we definitely love beans in our chili.

Chili is definitely one of those "soul" foods for Texans. My sister always tells a story about the time she lived in Rhode Island. She tried to throw a neighborhood chili cook-off, and a bunch of people showed up with clam chowder. Clam chowder? What a joke. The fact that someone would rather eat clam chowder than a spicy, meaty chili is incomprehensible to me.

It's funny how attractive soulful comfort foods can be. When I started making this chili, I had the intention to make a white chili with hatch chilis and spinach. But as I cooked, I couldn't resist turning back to my familiar flavors. Chili powder, cumin, tomatoes, mmmm. I wanted that smoky chili that would make my nose run without burning my mouth. In other words, I couldn't resist making a chili that felt like home.

TEXAN TURKEY CHILI

1/2 pound ground turkey
1/2 onion, diced
2 cloves garlic, minced
1/8 tsp red pepper flakes
1 can cannellini beans, drained
1 can kidney beans, drained
1 can crushed tomatoes
1/2 tbs cumin
1/2 tbs chili powder (to start, add more depending on your heat preference)
salt & pepper to taste
olive oil

In a large pot, brown the turkey over medium heat. Transfer to a paper-towel lined plate. Reserve a tablespoon of the fat in the pan.
Add the onions with 1/4 tsp salt, cooking until translucent. (If they start to stick, add a little olive oil.) Add the garlic and red pepper. Cook for a minute (don't burn!), then add the turkey back into the pot.
Add the the beans, tomatoes, and spices. Put on the lid and reduce to med-low heat. Allow to simmer for another 30-45 minutes, until the chili is thick. I suggest adding a little salt at at time, to taste. Remember that you can always add more salt. but you can't take the salt away once it's in.

Friday, October 29, 2010

baked sweet potato fries


My first year of college, I lived a right around the corner from the place called Kerbey Lane Cafe. If you live in Austin, you've heard of it. If you went to UT, you probably had a few wee-hour, post-party chow-downs there. They have these totally amazing sweet potato fries, served with chipotle mayo. And they're open 24 hours a day, every day! Also, I gained a hefty 15 pounds my freshman year--what a coincidence, right?

Since then, I've said a not-so-heartfelt goodbye to my freshman 15, along with the 2am meals at Kerbey Lane. But I still crave those sweet potato fries. Except now I make them myself, in a slightly healthier, baked incarnation.

BAKED SWEET POTATO FRIES

1-2 large sweet potatoes
4-5 tbs olive oil
1 tbs salt
1 tsp pepper
1/2 tsp chili powder

Preheat the oven to 375. Peel the sweet potatoes and cut them into uniform fry-shapes. Toss them on a baking sheet with a few tablespoons of olive oil and the seasonings (use your own seasoning discretion; it's an inexact science.) Arrange in a single layer and bake 30-40 minutes, turning once in the middle of baking.

Thursday, October 28, 2010

flourless peanut butter cookies


If you know me "in real life," you probably know my love affair with peanut butter. It's one of my main food groups. I've been known to carry a jar around in my car. Just in a case of a, you know, emergency requiring, uhh, peanut butter.

I firmly believe that peanut butter deserves respect beyond pb&j's (though I love them) and pad thai (still one of my favorites.) It deserves to be fabulous. It deserves to be a cookie.

These are totally flourless, but they compromise nothing. They're gooey on the inside, crunchy on the outside, and oh so peanut butter. If you can spring for the organic, stir-up kind of crunchy peanut butter, do it. The taste is infinitely better, not to mention hydrogenated oils do scary and mysterious things in your gut.

Also, thus far I've found that these freeze pretty well. Keep them stocked for your cookie fix.

FLOURLESS PEANUT BUTTER COOKIES

1 cup crunchy peanut butter
1/2 cup sugar, plus extra for dusting
1/2 cup brown sugar
1 egg
1 tsp baking soda
1 tsp vanilla extract
1/4 tsp salt

Preheat the oven to 350. Thoroughly combine all the ingredients in a bowl. Roll tablespoons of dough into balls, then roll them in the extra white sugar to coat. Arrange on a parchment paper-lined baking sheet. Press down with a fork (you know, those pretty fork marks.) Bake for 10-12 minutes.


Sunday, October 17, 2010

roasted butternut squash soup with a secret ingredient


Check me out, being a grown-up, cooking squash! Enjoying squash, even. It's surreal. If I ran into my 10-year-old self, I do believe she'd give me a very scathing "I don't even know who you are anymore."

Clearly, I've jumped on the fall flavors wagon. While I was researching butternut squash recipes, I found a video of Giada making a savory butternut squash risotto with vanilla. Being a practical skeptic, I found myself leery of savory vanilla. Even though I love Giada. Even though everything she makes is heavenly. Even though I have what we may call a "girl crush" on her.


Yet again, foodie curiosity got the best of me. I threw some vanilla (acting on wild impulses occasionally works in my favor) in the soup. It is. So. Good. I'm sorry I ever doubted Giada. The vanilla makes the soup fragrant, and beautifully delicious in that "I have no idea why this is so good but it is" kind of way.

BUTTERNUT SQUASH SOUP with VANILLA

1 butternut squash
1/2 large onion
1 tsp ground sage
1 tbs vanilla extract
16 oz (half a box) chicken stock
salt & pepper
olive oil

Preheat the oven to 400. Peel, core, and cut the squash into cubes. Dice the onion.
On a baking sheet, toss the squash with a drizzle of olive oil & a sprinkle of salt and pepper. Bake until soft, about 10-15 minutes.
In the meantime, heat a large pot with a few tablespoons of olive oil over medium heat. Cook the onions until they are soft and start to brown, about 10 minutes.
The squash and onions should be ready about the same time. If the onions go to far, remove them from the heat for a few minutes until the squash is ready.
When the squash is cooked through, throw it into the pan with the onions. Toss together for a minute or so, then add the chicken stock. Allow to return to a boil.
When the soup is cookin' again, use an immersion blender to blend until completely smooth. (I'm assuming you could do this in a regular blender, though I didn't try.)
Add the sage, and the salt & pepper to taste. Allow the soup to reduce for a few more minutes. When it's thickened to your liking, remove from the heat and stir in the vanilla.

Sunday, October 10, 2010

carrot green apple salad (slightly tardy)


Right now you're probably thinking, "Carrot salad, Amanda?" It's October. Shouldn't you be breaking out the pumpkin?" Well, perhaps you're right. But remember when I said, we don't have autumn in Texas? All we have is "godawfully hot" and "those couple months where you have to wear jeans." And while it has been a beautiful and mercifully mild 80 degrees here the past couple weeks, I'm not quite ready to start my "fall" flavors.

So here's one of my very favorite summery salads--in October. I like mine a little sweet (I know, shocking), but if you prefer, you can leave out the honey & cinnamon.

CARROT APPLE SALAD

2 cups carrots (I used baby carrots)
1 granny smith apple
1/3 cup raisins
2 heaping spoons of plain yogurt
1 tsp honey
1/4 tsp cinnamon
salt & pepper to taste

Using a food processor shredder, shred the carrots and half of the apple. Peel and dice the other half of the apple. In a medium bowl, combine the yogurt, honey, and seasonings. Stir in the carrot mixture and diced apples.

Makes 2-ish servings.

Thursday, September 30, 2010

classic banana nut muffins: the safe version


Oh, banana bread, we meet YET again. Take a look through this blog, and you will find that banana muffins and I are good friends.

It's not that I love banana nut bread more than any other treat. It just seems that people frequently pawn off sickly-looking bananas on me. And, being a soft-hearted person, I can't turn these ghastly-looking creatures away. Come into my kitchen, I say, we'll make you pretty again, my triploid friends!

Today, I created my own recipe and it miraculously worked out again. Clearly, the gluten-free baking force is with me lately. Though I love wild and crazy banana bread deviations, this is a return to everything that is classic and lovely about banana bread. Bananas. Honey. Pecans. Except this time, it's gluten and dairy free. Double happy.

BANANA NUT MUFFINS, Gluten Free
(Wheat flour recipe follows)

1/2 cup almond flour *
1/2 cup sorghum flour *
1 cup rice flour *
2 tsp xanthan gum *
2 tsp baking powder
1/2 tsp baking soda
1/2 tsp salt
1/2 tbs cinnamon
2 overly ripe bananas, mashed
1/4 cup honey
1/2 cup coconut oil or butter
2 eggs
1 cup chopped pecans
1 tbs sugar

Preheat oven to 350 and line muffin tins.
Combine the first 8 ingredients in a large bowl, and whisk until the flour is uniform.
In a separate bowl, thoroughly combine the bananas, honey, oil, and eggs. (I actually combined mine with an immersion blender; it really helps with the texture of the muffins.)
Pour the wet ingredients into the flour mixture. Beat until the mixture becomes thick and uniform. Fold in the chopped pecans.
Divide batter among baking cups and sprinkle with the sugar. Cook for 22-24 minutes, or until a toothpick comes out clean. Remove from pan asap to cool.

Monday, September 27, 2010

gluten-free apple cinnamon muffins


I'm jumping on the fall-flavors wagon--even though Texas doesn't really have what most people consider "autumn." Even though we'll continue to experience 90-plus degree weather well into November. To hell with it. Seasons are subjective! And, I'd like to point out, we did have a frigid cold front today...60 degrees this morning and only 85 this afternoon! Oh baby. I'm breaking out the heavy coats. Singin' Frosty the Snowman down here.

All weather aside, when my 8pm sweet craving crept in yesterday night, I wanted something warm and toasty. And I wanted to, at last, completely wing-it on gluten-free baking. It was a deeply gratifying (aka messy and anxiety-causing) experience. But here I stand--light jacket on, apple cinnamon muffins in hand. Today is indeed the day the Lord hath made. Let is rejoice and be glad and eat muffins in it.

Note: I used gala apples, because they're all I had, and they turned out great. However, granny smith is usually my go-to baking apple.

GF APPLE CINNAMON MUFFINS

Wet:
1 egg
3/4 cup applesauce
1/4 cup honey
1/4 cup coconut oil
1/4 cup sugar
1 tbs vanilla
Dry:
1/3 cup tapioca flour*
1/3 cup brown rice flour*
1/3 cup white sorghum flour*
1 tsp xanthan gum*
1 tbs cinnamon
2 tsp baking powder
1/2 tsp baking soda
1/2 tsp salt
And...
1 1/2 cups diced apples

Preheat oven to 350 and line baking cups. Thoroughly combined the wet ingredients in a large bowl. In a separate bowl, whisk together the dry ingredients until very well combined.
Add the flour mixture into the wet ingredients, and stir thoroughly (don't worry about over-mixing.) Then, fold in the diced apples.
Using an ice cream scoop or large spoon, divide the batter into the cups. Bake for 20-22 minutes, or until a toothpick comes out clean.

Makes about 10 muffins.

Wheat eaters! To make these muffins "normal," substitute 1 cup of regular flour for all the ingredients with an *asterisk.

Sunday, September 26, 2010

kid pasta with pistachio (cashew) cream sauce


Okay, so I know it ain't pretty. And I know it's on Bob the Builder shaped gluten-free pasta. (Don't judge me...I'm a Gemini with a very active inner child.) But lemme tell you. This "cream" sauce. God. Pistachios. Pasta too. I loved it so much, it's rendered me incapable of forming cohesive sentences.

I was raiding my pantry today, and happened to see some pistachios left over from my good friend, the pistachio pizza. (This itself was a miracle, as I have minimal self control around pistachios.) Then I was surfing Pinch My Salt, and found a recipe for Sicilian pistachio cream pasta. I considered it fate.

Since I'm on the no-dairy wagon, I decided to try my hand at pasta sauces with cashew cream. It was all that I hoped it would be...creamy, rich-tasting, with none of that "ohmygod-i-ate-so-much-pasta-i-hate-my-life" feeling afterwards. And, the flavor and subtle crunch of the pistachios? Muah. I wanna go on a date with this pasta sauce.

PISTACHIO CASHEW CREAM SAUCE

1/2 yellow onion, finely chopped
1 clove garlic, minced
1 cup pistachios, raw
1/2 cup cashew cream
3/4 cup chicken stock
olive oil
salt & pepper to taste

In a food processor, finely chop the pistachios until they just have a little bit of texture left.


Heat a skillet over med-high with a couple tablespoons of olive oil. When the oil is hot, throw in the onion and cook until soft. Just when the onion starts to take on a little bit of brown color, toss in the garlic. Cook for another 30 seconds or so.
Then, reduce the heat to medium and toss in the pistachios. Mix together for about 1 minute, until the mixture is paste-like and you can smell the pistachios toasting.
Mix in the cashew cream, then add the chicken stock. Season well with plenty of salt and black pepper. Allow to reduce, stirring frequently, until it is the right consistency for sauce. If the sauce seems too tight, add a little more stock.

Serve with penne, farfalle, or (if you're adventurous) kiddo pasta.
If you're eating gf pasta, get the corn-based kind. It's the best!
Serves 1 with a little leftovers.

basic cashew cream


I know I've covered a version of this before, but I felt the need to simplify further. This little food phenomenon is creamy, nutritious, and virtually taste-free. In other words, it's the perfect substitute for heavy cream in sweet and savory recipes. Here's how I make mine...

CASHEW CREAM

2 heaping cups cashews
1 cup water

Put the cashews & water in a bowl, cover, and allow to soak overnight in the refrigerator. When the cashews are soaked, drain off & reserve the excess water, and put the cashews in a food processor or blender. Blend on high, adding a little bit of water at a time, until creamy. This is a very inexact science, and the cashews may require some coercion, but once you've got it you've got it!

This makes about 2 cups of cream.

salted caramel brownies


Remember when we spoke about my sweet & salty tooth? Well, it strikes again. I've been flirting with the idea of making these ever since I had salted caramel ice cream from The Red Trolley in Denver this summer. And, I'm not even going to try to tell you how much I love these, because (clearly) it's a brownie. And when have I ever met a brownie I didn't like? Never, my dear friends. Never. (However, I will say that these are maximally sweet, salty, chocolatey, and gooey all at once.)

I will confess that I didn't make my own caramel for these. I attempted homemade caramel once, several years ago, and it was a deeply traumatic experience. So this time, I left it up to the capable chefs at Central Market. But if you're feeling ambitious, by all means, DIY it.

The only problem I had with this recipe is that the caramel melted into the brownies and wasn't very detectable. So, I've adapted the recipe slightly to accommodate.

WHEAT-FREE SALTED CARAMEL BROWNIES

1/2 cup unsalted butter or margarine
1 1/8 cup sugar
3/4 cup dark cocoa powder
1/2 tsp baking powder
1/2 tbs vanilla
2 eggs
3/4 cup oat flour (or you can substitute regular flour)
1 cup caramel
1 tbs kosher salt plus some for garnish

Preheat oven to 340 and grease a 9x9 square baking pan.
In a saucepan or in the microwave, melt the butter. Remove from the heat, add in the sugar, and stir until combined. Briefly return to the heat, just until the mixture is hot. Transfer to a large bowl and allow to cool for a moment (ideally while you prepare everything else.)
Add the cocoa powder and baking powder into the butter mixture. When combined, add the vanilla and eggs. Last, stir in the flour until the mixture is smooth.
Pour the batter into the baking pan. In a small bowl, mix together the caramel and salt. Then, pour the caramel over the top of the brownie batter. Using a knife, slightly swirl the brownie batter with the caramel.
Baking for 22-25 minutes, or until the edges are set. The brownies may look too soupy in the middle at first, but they will set while they cool. Sprinkle some sea salt on the top of the brownies while they cool.

Wednesday, September 22, 2010

pistachio pizza with caramelized onions


The inspiration for this pizza came from an episode of the Food Network's The Best Thing I Ever Ate, which is food porn to the highest degree. Could it be possible that two of my most beloved foods, pistachios and caramelized onions, could be combined on one of the world's most perfect foods, pizza?!

Apparently it is possible. I whipped this up (gloriously quickly, the miracle of pizza) last night with a fellow pistachio-lover. I'm not going to provide measurements for this recipe, because I know you know how to put a pizza together. So I'll leave the degree of sauciness, cheesiness, and pistachio-and-oniony-ness up to your preference.

PISTACHIO PIZZA

1 gluten-free pizza crust
1/2 large onion
olive oil
1 tsp sugar
pesto (jarred or fresh)
fresh mozzarella
pistachios (roasted, salted, shelled)
salt & pepper

Slice onions thinly and throw them into a pan with olive oil over medium heat. Add 1/2 tsp salt and the sugar. Cook slowly until caramelized.
Following the instructions on your pizza dough, prepare your pizza crust. When it's ready for toppings, add the pesto & cheese. Cook until the cheese is melty and the crust is golden-brown.
Remove from oven and add desired amount of pistachios and onions on the top. Return the pizza to the oven for 1-2 minutes. Allow to cool, sprinkle with salt & pepper, slice, and serve!

Monday, September 20, 2010

Classic Blueberry Muffins: the explicit version


Ahh. For me, this is one of those foods that makes me all warm and fuzzy with happy memories. My mom used to make these muffins for my brothers and I when we were kids. Sometimes we would eat entire meals composed only of muffins, butter, and milk. And, on another nostalgic note, these were the very first thing I started baking.

Today, a dear friend of mine is having his birthday, and he requested these muffins. Not the safe, gluten-free version, but the sweet, glutenful, sinful version. But, I like to think I'm a good friend. Who am I to deny the muffins? So here's a recipe from my wild, gluten-eating years. Warning: you might shed sweet tears when you eat these. They do that.


MOMMA'S BLUEBERRY MUFFINS

1 egg
1 cup milk
1/2 cup oil
2 cups flour
1 cup sugar
2 tsp baking powder
1/2 tsp salt
1 tbs cinnamon (this makes the muffins)
2 cups fresh or frozen blueberries

Preheat oven to 400. Line or grease a muffin tin. In a small bowl, mix together the first 3 wet ingredients. In a large bowl, mix the remaining dry ingredients and blueberries. Form a well in the center of the dry ingredients and pour in the egg mixture. Mix, sparingly, until everything is just combined. DO NOT OVERMIX, you'll get tough muffins. Immediately spoon into muffin tins and bake for 20-25 minutes.

Makes a dozen muffins, with a little batter-snacking.

In Production: gluten free blueberry muffins

Monday, September 13, 2010

slightly salty honeyed apples


You may have noticed, I have a sweet tooth. Really, I have a whole set of sweet teeth. But, I think somewhere in my jaw lurks a highly specialized sweet & salty tooth. And that's what brings us here...

These apples originally started out as a topping for pancakes. But once again, pancakes and I didn't get along. So, this lovely little topping ended up on coconut milk vanilla ice cream. Hey, can't complain! Never met an ice-cream topping I didn't love.

HONEYED APPLES

1 large, tart apple
1 tbs butter
1/4 cup honey
1/2 tsp salt
1/2 tsp cinnamon

Peel, core, and dice the apple into small pieces. Add them into a saucepan with the melted butter, and let those hang out for a few minutes. When the apple has started to brown and soften, add in the honey, salt, and cinnamon. Cook down until well-combined and syrupy, another few minutes. Add over pancakes, oatmeal, ice cream, toast, or just solo!

simple veggie miracle: roasted broccoli


How have I not done this before? I preach (seriously...preach) roasting veggies to every cook I know; yet somehow broccoli has been overlooked. I apologize, broccoli. No surprises here, broccoli is infinitely better when it's roasted. It actually tastes like...broccoli! And it retains its crunch, which is a plus because we all know that limp vegetables are a crime.

I'm never steaming again. Ever.

ROASTED BROCCOLI

2 cups frozen or fresh broccoli
2-3 tbs olive oil
1 tsp salt
1/2 tsp black pepper

Preheat the oven to 350. Toss all the ingredients together in a roasting dish or baking sheet. Bake for 10-15 minutes, stirring occasionally, until the broccoli is still slightly crunchy and slightly browned.

Saturday, September 11, 2010

spicy sautéed green peas


Dear green peas,
Why did I spend my whole childhood fearing you? It's true, you're green and suspicious-looking. And yes, we had a very bad time together when I tasted you out of the can. Green peas, it's all in the past now. I love your sweet little green spheres popping in my mouth, like tiny bits of happy. I'm so glad we can be together now, my veggie darling. And this is how I like you best...

SPICY SAUTEED GREEN PEAS

2 cups frozen peas (if you can get fresh, more power to ya)
1 tbs (one big clove) of minced garlic
1/8 tsp crushed red pepper flakes
2 tbs olive oil
salt and pepper, to taste

Add the peas to a skillet with about 1/2 cup water and bring to a boil. As soon as it starts to boil, drain off the water. Add the olive oil and garlic into the pan with the peas. Let the garlic sweat with the peas, stirring frequently, for roughly 1 minute. (If the peas start to get a little char, don't freak out, it's a very good thing. But don't burn the garlic!) Add the crushed red pepper, salt, and black pepper.


This serves about two people, if they're not greedy pea eaters like me. Also, if you're spicy-shy, you might want to hold off on the red pepper.

Thursday, September 2, 2010

banana bread muffins...again

(Due to my forgetfulness and blogger irresponsibility, muffin pictures are not available.)

And so we meet again, overly ripe bananas. For me, banana bread is the only way to deal with those gnarly-looking, bruised babies. Once bananas get past their perfectly yellow, ice-cream worthy prime, banana bread is simply the only way to go.

I must confess, today I got a little overly enthusiastic about my banana bread additives. Since bananas take anything like a man, I often find myself wildly throwing in ingredients ("And a little bit o' this, and a little bit o' that, and now somma THAT!") So today, as I was christening the oven in my new apartments kitchen--keep in mind I can't even open the fridge without hitting the opposite wall--things got out of hand.

Today's banana bread muffins contain oconut, and pecans, and lord knows what else. And they're good. They're not the picture of minimalism or traditionalism in baking, but I must say they're good. If you're looking for yummy, not-too-sweet muffin that represents my sometimes overzealous baking, make these.

BANANA MUFFINS WITH EVERYTHING

3 cups almond flour
1 1/2 tsp baking soda
1/2 cup flaked coconut
1/2 cup chopped pecans
1 1/2 tsp salt
2 cups mashed, ripe bananas
3 eggs
1/4 cup honey
2 tbs melted butter or oil

Preheat oven to 350 and line muffin tin with liners. In a large bowl, combine all the dry (the first 6) ingredients. In a separate bowl, mix the wet ingredients until well-combined. Pour the wet ingredients into the dry and mix until combined. Spoon (I use an ice-cream scooper) into muffin cups and bake for 25 minutes. Allow to cool a few minutes before munching.

Sunday, August 29, 2010

slow-roasted cherry tomatoes with garlic


I have a confession. After I made these, I ate them all. And I'm not going to pretend that I used an eating utensil. It was one of those, pick-one-off-the-baking-sheet, then another, then another, until they're all gone phenomenon. I was so hasty to eat these lovelies that I didn't bother to snap a decent picture, and for that I apologize. To you, and the tomatoes.

I first experienced these tasty little nuggets a couple years ago, when my foodie friend Preston let me try just one of them in his kitchen (when you taste them, you'll understand why I can forgive him for being stingy with his cherry tomatoes.) The flavor of such a tiny tomato after roasting is completely unexpected. It's intense, sweet, amazing, amazing, tastes like a well-seasoned tomato sauce, oh my god. I think the fact that I still vividly remember this one bite in Preston's kitchen after two years is a testament to how good they are.

Since that fateful, tomato-y day, I hadn't been able to recreate these little miracles. But, when I was surfing the ever-mouth-watering Pinch My Salt this weekend, I decided to give slow-roasted cherry tomatoes a try again. So, I followed the directions, and voila! And boy, am I glad I tried them. And I suggest you try them too.

Oh, by the way, the soft, mellow, roasted garlic is the perfect friend to our little tomatoes. Check out sweet baby garlic clove front-and-center in that picture, oh baby.

SLOW-ROASTED CHERRY TOMATOES

1 basket cherry tomatoes
1/8 cup (or a good drizzle) olive oil
1 tsp Italian seasoning
1 tsp dried basil
a few cloves of unpeeled garlic
salt & pepper

Preheat the oven to 225. Cut the cherry tomatoes in half, lengthwise, and put them on a baking sheet with the garlic. Coat the tomatoes (hands work best for this) with the olive oil and seasonings. Bake for 2 1/2 - 3 hours, or until the tomatoes are shriveled up but not crispy. The spices may get a little black, but that's natural, and it doesn't affect the taste.

Friday, July 30, 2010

mexican chocolate avocado mousse--aka "choco guaco"


First of all, I have to give Naomi at Straight Into Bed Cakefree and Dried major points for inspiration. She comes up with some grain-free and mind-blowingly innovative foodie ideas. This morning, I found myself dazed and intrigued by her idea of adding avocados to sweet, chocolate recipes.

It made total sense when I thought about it. Avocados are buttery, mild in flavor, and easily disguisable. And though I usually do a pretty epic job of convincing myself that butter isn't dairy OR fattening, sometimes I crave a lighter alternative.


This is a light, fluffy, Mexican-inspired chocolate mousse. I love the combination of sweet & smoky heat so I sprinkle mine with chili powder. Oh, and I promise, there's no detectable avocado. Just creamy goodness.

MEXICAN CHOCOLATE AVOCADO MOUSSE

1 large hass avocado
2 tbs cocoa powder
4 tbs powdered sugar
1 tsp vanilla extract
2 1/2 tbs almond (or any kind of) milk
1 tsp cinnamon
1/2 tsp salt
2 egg whites
chili powder for garnish

With an electric beater or food processor, combine the first seven ingredients until smooth. (If you omit the cinnamon, this itself makes a great chocolate frosting.) In a separate bowl, whip the egg whites until stiff.
Add the chocolate mixture to the egg whites and mix by hand until combined. Chill, and sprinkle with the chili powder.

Tuesday, July 27, 2010

crispy oven potatoes


Ah, what more do I need to say? The potato is a beautiful vegetable. These crispy, fluffy-on-the-inside babies give the illusion of eating fried, naughty food. If you can spring for the organic potatoes, do it. There's such an enormous difference in the flavor (meaning, they actually have a flavor.)

When you cut the potatoes, try to make them as thin and even as you can. However, don't fret if you're a sloppy cutter like me. You'll just have to know that some potatoes will be softer and some will be a bit charred (mmm...in the words of Alex Guarnaschelli, "a poetic burn.") Secretly, I like the whole 'variety pack' thing!

CRISPY OVEN POTATOES

3 small-medium russet potatoes, peeled and sliced thinly
1/8 cup olive oil
1 1/2 tbs salt
1 1/2 tsp pepper

Put your empty cast-iron skillet or baking sheet into the oven and preheat to 350. (Preheating the empty pan will prevent sticking and promote browning on the potatoes)
While the pan is heating, thoroughly dry your potato slices (this also promotes crispiness.) Add them to a bowl with the olive oil, salt, and pepper. Mix until the potatoes are all coated--hands really work best for this task.
Remove the pan from the oven (don't forget oven mitts!) and carefully spread the potatoes in one layer.
Bake for 13-15 minutes, or until soft. Then, move to the top rack under the broiler for 2-3 minutes, or until they are golden brown.
Remove them from the pan asap, so they don't stick.

Sunday, July 18, 2010

sweet cashew cream


Here's a confession: I miss dairy. I mourn the day that I discovered that my chronic "pollen" allergies were, in fact, some warped cow-dairy allergy. Although I've learned to accept it, there are days that I miss delicious, creamy dairy products like a long lost lover. (I'll admit that, on several occasions, I've devoured a whole plate of cheese enchiladas, only to spend the next 48 hours suffering through a shameful, phlegmy head-and-face-ache.)

But enough of my woes. I'm a resourceful lady. Therefore, I've been forced to find creamy, yummy substitutes. Remember the Just Banana Ice Cream? Well, meet another food miracle: cashew cream! This little guy is made from cashews--yes, just cashews. And it can be used in dishes from pseudo-cheesecakes to cream-esque pasta sauces. Or, just add a little agave, some vanilla, throw on some frozen blueberrries...you're good to go. Expect more to come from my new friend.


Sweet Cashew Cream

1 cup cashews*
2 cups water
3 tbs agave
1 tbs vanilla extract
1 tsp salt

Put the cashews in a bowl covered with the water. Let them soak overnight in the fridge.
Drain the cashews, reserving the soaking water. Add the cashews to a blender with 1/4 cup of water, agave, vanilla, and salt. Blend, and keep blending, keep blending, until smooth. Serve in a parfait or as a substitute for whipped cream.

* For convenience, I used unroasted unsalted cashews. If you use salted cashews, make sure to leave out the added salt.

Friday, June 18, 2010

green beens with shallots and pecans


I just can't resist fresh green beans whenever I see them at the grocery store. They always look so gorgeous! Lately, my roommate and I have gotten in the habit of making up a huge pot of green beans and polishing off the whole thing for supper. It's cheap, easy, fast...what more could you want?

This is one of my favorite ways to make green beans. It's a twist on the classic green beans amandine. (I'd like to point out that "amandine" almost seems like a frenchified version of my name, and I've always found that very cute.) Another day, I'll talk about that lovely southern dish, string beans cooked down with bacon. But today, we celebrate the crunchiness and freshness of the green bean.

GREEN BEANS WITH SHALLOTS AND PECANS

1 bunch fresh green beans
1 shallot
2-3 tbs butter
juice of 1/2 lemon
1/4 cup pecans
salt & pepper

With scissors, snip the ends off of the green beans. Prepare an ice bath (a large bowl filled with ice and water.) Boil a large pot of water with a couple tablespoons of salt. Cook the beans in the boiling water for 3-4 minutes, until they are just tender but still slightly crunchy. Immediately drain the beans and drop them in the ice bath. This will halt the cooking process and prevent soggy beans.

Return the same empty pot to the stove, and melt the butter. While the butter is melting, peel and and cut the shallot into very thin slices. When the butter is melted, add the shallot. Cook the shallots, stirring often, until they are translucent and slightly caramelized.

Add the green beans back into the pot. Coat in the butter and shallots. Squeeze half a lemon over the top of the green beans and give them a few shakes of salt & pepper to taste. Transfer to a bowl and add the pecans on top.

Tuesday, June 15, 2010

seriously best ever fudgy brownies


Let's just talk about brownies for a minute. I seriously love brownies. I mean, I love brownies more than most parents love their children. And honestly, I've never met a brownie that I didn't like. But today, I want to talk about a serious brownie love affair.

Tomorrow is my mother's birthday, and when I asked her what she wanted, she requested a pan of brownies. Now, my mother is a woman who loves brownies possibly even more than I do. She's a true aficianado. And after years of eating brownies with my mother, I know her standards: very dark, very rich, and very fudgy.

I believe it's far better to err on the side of undercooking than to pull a cake-like brownie out of the oven. Brownies are simply NOT a cake. If brownies were a cake, they would be called chocolate cake. That's a story for another day, my friend! But today, we make the best ever, super gooey, fudgy brownies. And we make them--for Mom!

This recipe is wheat-free, but you can directly substitute regular flour. You'll just have to cook it a bit longer. Also, this recipe has been adapted from a much-cherished recipe from a bag of King Arthur Flour.


WHEAT-FREE FUDGY BROWNIES

1 cup unsalted butter
2 1/4 cups sugar
1 1/4 cups dark cocoa powder
1 tsp salt
1 tsp baking powder
1 tsp coffee grounds (optional)
1 tbs vanilla extract
4 eggs
1 1/2 cups oat flour

Preheat the oven to 340, and grease a 9x13 baking pan.

Melt the butter in a saucepan. Remove from the heat and add the sugar, stirring until mixed. Return the pan to the heat, stirring until the sugar mixture is hot, but not bubbling. (This is a very important step because more of the sugar dissolves and it gives the brownies a very glossy top.)

Transfer the sugar mixture to a large bowl. While it's cooling, sift together the cocoa, salt, coffee, and baking powder. Add to the butter and stir until combined. Stir in the vanilla and eggs. Last, sift in the flour, and stir until completely combined.

Transfer the mixture to a baking pan and bake for 22-24 minutes. They may not look completely done when you take them out, but they will set up more as they cool.

agave roasted carrots


They're sweet, they're roasted, they're gorgeous...what more can I say? Other than that I apologize for the poor quality of this photo. It was night time by the time I made them so I had to use the dreaded flash. I promise they're more delicious than they appear.

The measurements on this are vague and approximate, because the recipe is vague and approximate in nature. Honestly, within reason, you can't mess this up. Roasting vegetables is generally fool-proof.

This recipe also only serves 1 or 2 people. Double or triple for a big family!

AGAVE ROASTED CARROTS

2 cups chopped carrots (whole or baby)
2-3 tbs olive oil
3-4 tbs agave nectar
salt
pepper

Preheat the oven to 400. Peel and cut the carrots into 1/2 inch pieces. Put them in a roasting dish or cast iron skillet. Give them a good drizzle of the olive oil, the agave, and the salt and pepper. Mix until all the carrots are well-coated, and bake for about 30 minutes, or until the carrots are nice and tender. Shake the pan a few times throughout the cooking process to make sure the carrots are really getting a coating of that agave.

Sunday, June 13, 2010

peanut butter apple chips


If I had to eat one thing for the rest of my life, it would probably be cold, sliced apples dipped in peanut butter. It's simple, it's nutritious, and it always tastes good--always. Luckily, I'll never actually have to eat just one thing for the rest of my life. So, I'm free to explore culinary possibilities!

Culinary possibilities of things like...baked apple chips? Even better, baked apple chips with a vanilla-scented, peanut butter glaze? It's snacking perfection. I like the apples to stay a little soft, but the peanut butter gets just slightly crunchy as it bakes. And oh. It is good.

A word of warning, this is quite a messy recipe. You'll get very peanut-butter-y. But don't fear! Delve into the messiness. Wholeheartedly enjoy the process of apple chipping (yes, I just created a new verb.) And no, these chips aren't exactly pretty. But you'll get over it, because you can make sacrifices for snack perfection.

PEANUT BUTTER APPLE CHIPS

1 granny smith (or any tart) apple
1/4 cup crunchy peanut butter
1 tsp vanilla extract
1 tbs agave nectar or honey
1/4 tsp salt
2 tbs milk or soy milk
2 tbs sugar

1. Preheat oven to 350.
2. Peel, core, and slice the apple as thinly as possible.
3. In a medium bowl, combine peanut butter, agave, and salt. Microwave for about 10 seconds, until the peanut butter is just warmed and loosened up. Add the vanilla and milk and stir gently until combined into a paste. Don't overmix, or the mixture will gum up. If it is too thick, add a little more milk.
4. Add the apple slices to the bowl. With your hands, stir everything together until the apple slices are all coated with the peanut butter mixture.
5. Lay the apples out in one layer on a parchment paper-lined baking sheet. Sprinkle the sugar over the apples.
6. Bake for 15-18 minutes, or until the edges of the apples and the peanut butter are crisp. Let the apples cool for a few minutes before you remove them with a spatula.